client
client is an SPA providing the web interface to site-business.
The client interface is intended for use at sites that intend to configure the
AP-Portal to directly query their compound databases.
Dependencies
- Maven (build)
- Java 7 8 [1] or higher (build, deploy)
- Java Servlet Container, e.g. Apache Tomcat (deploy)
- Database (build, deploy)
- A Maven-
installedclient-parentandclient-shared. See client-parent and client-shared
General topics
Initial installation
Download the project source and go to this component’s root directory (i.e. here) and follow the steps below.
- Either …
- … or …
- [ T ] Copy sample.pom.xml to
pom.xml- [ V ] Copy src/main/resources/bundle/sample.site.properties to
src/main/resources/bundle/site.properties- [ S ] Copy src/main/resources/META-INF/spring/ctx/config/sample.appCtx.config.site.xml to
src/main/resources/META-INF/spring/ctx/config/appCtx.config.site.xml- [ T ] Copy src/main/resources/META-INF/spring/ctx/ws/sample.appCtx.ws.security-outgoing.xml to
src/main/resources/META-INF/spring/ctx/ws/appCtx.ws.security-outgoing.xml- [ T ] Copy src/properties/database/sample.database.filter.properties to
src/properties/database/database.filter.properties- [ T ] Copy src/properties/database/sample.database.spring.properties to
src/properties/database/dev.database.embedded.properties- See Database choice
- [ T ] Copy src/properties/sample.filter.properties to
src/properties/filter.properties- [ T ] Copy src/properties/sample.spring.properties to
src/properties/spring.properties
If you intend to have a client-specific “prepopulated user authentication”
user authentication mechanism
database then also do the following :
- [ T ] Copy src/main/resources/META-INF/data/spring-security/local/sample.users.sql to
src/main/resources/META-INF/data/spring-security/local/users.sql
- … finally
- Edit each of the copied files according to your desired configuration.
Configuration
pom.xml
It may necessary in some circumstances, e.g. if there is site-specific access
control code being overlayed into the client src/main/java
directory, or if using a MySQL driver, to adapt the pom.xml file for
Maven-building the component.
src/main/resources/bundle/site.properties
site.compound_identifier=
Adjust the prompt message for compound identifiers (if necessary).
If the site is to be internationalised create all the corresponding language properties files,
e.g. src/main/resources/site_(es,zh).properties.
src/main/resources/META-INF/data/spring-security/local/users.sql
Adjust this according to your expected usage requirements :
- If you are using a local
client-specific “prepopulated user authentication” mechanism for authentication and authorisation, this file is required.
Please also check the following Note.- If you are using a “bespoke user authentication” mechanism, or if “prepopulated user authentication” users are shared between
clientandclient-directinstallations (and hence defined inclient-shared), then this file is not required.
Note
If there is a new registration request the requesting user’s details
are not automatically written to the user database.
New users must be manually added to this users.sql file and the
system restarted – for this reason it is better to create a number of
unissued usernames and passwords (commensurate with the total anticipated
usage) and then distribute them to new registrations as they arrive.
src/main/resources/META-INF/spring/ctx/config/appCtx.config.site.xml
c50Units
Preferred units for displaying inhibitory concentration, e.g. IC50 [nM], IC50 [µM], pIC50.
Cut-and-paste your preferred unit to be the top/first <entry /> value.
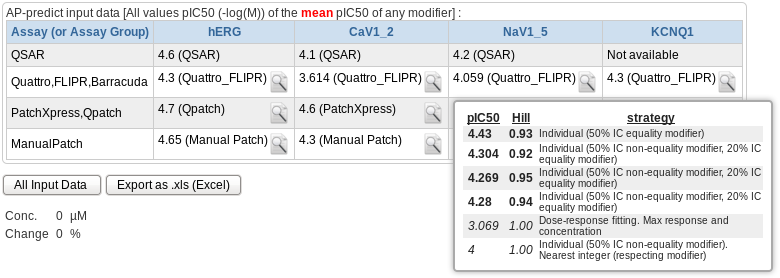
configuration -> inputValueDisplay
Choose how to derive the mean of pIC50 ApPredict invocation input values.
Set the value of the ref="" attribute to one of the following :
INPUT_VALUE_DISPLAY_ANY_MODIFIER
Display the mean of all pIC50 values, irrespective of modifier (i.e. include ‘=’, ‘<’, ‘>’).INPUT_VALUE_DISPLAY_EQUALITY_MODIFIER
Display the mean of pIC50 values only where there was an equality modifier (i.e. use only ‘=’).
src/main/resources/META-INF/spring/ctx/ws/appCtx.ws.security-outgoing.xml
Generally no change necessary.
src/properties/database/database.filter.properties
client_direct.database.queryTimeout=
Data query timeout (in milliseconds). Shouldn’t need to be higher than 200?
src/properties/database/dev.database.<deploy.db_vendor>.properties
See also
src/properties/filter.properties
log.file.client=
Component log file location on disk, e.g. ‘logs/client.log’
log.level.client=
Component log level, e.g. (trace|debug|info|warn|error|fatal).
log.level.general=
Log level of code from other libraries, e.g. (trace|debug|info|warn|error|fatal).
business_services.ws.url=
WS URL of site-business component, e.g. ‘http://localhost:18080/site_business-0.0.2/bws/’
src/properties/spring.properties
recaptcha.private.key=
reCAPTCHA private key.
recaptcha.public.key=
reCAPTCHA public key. If this field is left empty it will be assumed that no reCAPTCHA is available!
securement.business.username=
site-business WSS username.
securement.business.password=
site-business WSS password.
Build
See also
Database choice and Spring profiles for additional information.
-Dspring.profiles.active=
Options are currently client-shared_(embedded|mysql|oracle10g),client-shared_(bespoke|prepopulated).
Warning
At build time it is important to include the
client-shared_embedded spring profile during building because during
integration testing rubbish may be written to the database so it is important
to use the embedded database during the build process.
-Ddeploy.db_vendor=
The name of the database vendor, e.g. mysql, postgres, used in the
intended deployment (not build) environment. The actual name used
corresponds exactly to the <deploy.db_vendor> element of the file derived from
sample.database.spring.properties during the installation process.
-Ddeploy.env=
The environment name, i.e. dev.
Example build instructions (illustrating use of embedded during the build process, and mysql in the deploy environment):
cd <ap_predict_online>/client
mvn clean verify -Dspring.profiles.active=client-shared_embedded,client-shared_prepopulated -Ddeploy.db_vendor=mysql -Ddeploy.env=dev

